This weekly debrief is for paying supporters of my work. Please only read if you’ve paid. Thanks!
→ Click here if you've paid ←
I’ve been busy these past two weeks: I fell ill, I finished my final exam (woo!), and I’ve been working on potential hardware designs for bedrock-micro since then.
bedrock-micro
I keep getting stuck on this project, there are so many conflicting requirements that I want to somehow figure out a solution for.
The main problem I’ve been dealing with is that my ideas all seem to be solved better by existing systems. If bedrock-micro wants to be a microcontroller-like development board, it can’t compete with the Arduino boards for how tightly the programs can integrate with the hardware (like how you can do cool things like bit-bash audio over the IO pins). If bedrock-micro wants to be a tiny handheld games console to teach programming, it can’t compete with pretty much every computer-based game programming system in existence for price and speed.
I’ve also been struggling to come up with a design that fulfils all of my goals without each goal somehow compromising the others. I want to have GPIO pins on the board for integrating with electronics projects, but pins are sharp and boards are fragile and I want kids to be able to use this thing without destroying it. I want the system to be as simple as possible with no screen or buttons or speakers, but omitting these pieces will limit the kinds of cool things that people can do with it. If I add a screen and a couple of buttons and a nice protective case, it’ll just look like any other retro-clone handheld but way less powerful, and being able to see ‘inside’ the machine by looking at the circuit board is a big part of the value of the thing.
So I was going around and around trying to square these particular circles, trying to figure out how I can design a cheap and simple system that can help primary and secondary school kids learn to program and build circuits, while also coming up with something that will be useful for people who want to build interesting projects. What is it that Bedrock brings to the table?
Bedrock is a computer
The answer I came to in the end is that Bedrock is first and foremost a universal computer system. Arduino boards can be used as computers with the right peripherals, but programs will only run on that specific board with those specific peripherals. PICO-8 programs need a web browser or a modern operating system to run, they can’t hope to run on an 8-bit microcontroller. Bedrock programs, on the other hand, can run more or less anywhere, and can interface transparently with a bunch of different hardware. They have access to a file system, to a mouse and keyboard, to a screen, to networking, but more importantly they can do without in a pinch.
What if the point of bedrock-micro is to be a hardware implementation that anyone can build, for a computer system that anyone can implement? Give someone a handful of chips, a soldering iron, and an assembly guide, and they can put together their own working computer system from something like $20 worth of parts. It won’t have a keyboard or a screen, but they can build those too. Buy a bunch of cheap buttons from an electronics shop and solder them to some prototyping board to make a keyboard, buy a cheap LCD panel and a basic microcontroller to put together a screen. Take the minimalism and DIY-ness of Bedrock and extend it to the hardware that you run the programs on, and give someone an avenue to learn electronics while they’re at it.
I really like the idea of hyper-personalised computers. If you want a real-time clock for your computer, you can draw up a design and solder it together yourself. If you want to hook your computer up to some kind of radio-based internet thing, you can solder up something for that too. People can build computers that perfectly fit their needs while still being able to run the full library of programs that people have written for Bedrock so far. There’s a bit of a fad at the moment around ‘cyberdecks’, portable computers with a DIY aesthetic, but they’re invariably built around a Raspberry Pi and a chunky battery. I’d like to think that bedrock-micro could be a path to a truly diverse computer ecosystem.
A plethora of systems
Continuing on from that last point, I’ve come to realise that a single hardware design can’t possibly work for every single use case, no matter how much I rack my brains over it. So why not come up with a couple of designs instead? Have one design that you can build yourself, in the style of the electronics kits you used to be able to buy from Dick Smith in the 80s, 90s, 2000s, and have another design that you can throw into a mob of hungry primary school kids and have it come out unscathed at the end of the day. All designs can use the same basic hardware on the inside, it’s really just the form factor and peripherals that differentiates them.
Three designs
A box of scraps
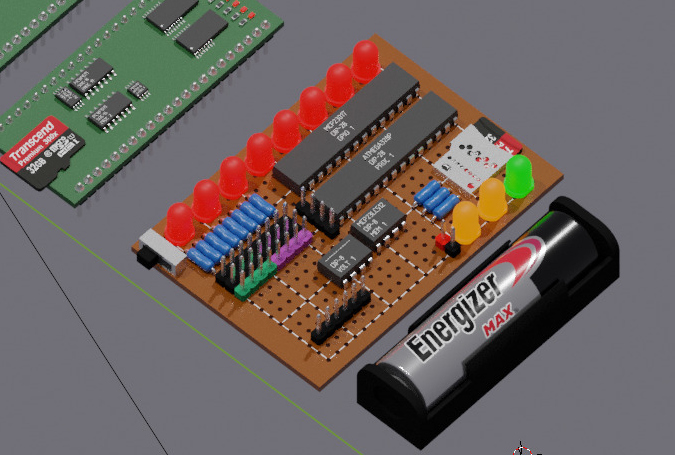
The first design will be a prototype system, built with chunky through-hole components soldered to prototyping board. The purpose of this system will be as a proof of concept more than anything, it’ll show that the system can be hacked together with grit and gumption without the need for a custom fabricated PCB or anything fiddly like that. You can sort of just solder it together like a LEGO kit.
The system will be built around an ATmega328 microcontroller (8-bit, lots of pins), with a 64KB memory chip, a GPIO expander chip, a microSD card slot, a row of eight red LEDs, and a bunch of pins for input-output and to connect external device modules to the system. Everything needs to fit neatly onto a 50x70mm rectangle of board. I wanted to include a single AA battery holder onto the board for power as well, but there isn’t really the space for it with all the LEDs and resistors and large chips.
Programs are loaded from the microSD card by a bootstrapping program, and can communicate with the user by controlling the eight red LEDs if a proper screen hasn’t been connected. The board just needs enough to be able to see that the system is alive and working. You’ll also be able to see a green LED light up when the system is powered on, and a pair of amber LEDs light up when the CPU and the device bus are busy, to make it easier to figure out when the board is thinking.
Yeah, that’s pretty much that. Components and prices are NZD$5.97 for the ATmega328 microcontroller, NZD$3.22 for the MCP23S17 IO pin expander, NZD$3.38 for the 64KB RAM chip, NZD$2.43 for a microSD card slot, and a couple of dollars extra for the LEDs, resistors, header pins, and the board. Make it a round NZD$20 all up.
I should probably give a quick reason for changing the core microcontroller while I’m here. I’d previously been looking at the real basic 8-bit PIC microcontrollers, because I like the idea of using the absolute most minimal hardware possible to prove a point, but after a lot of thinking I’ve decided to go for the ATmega328 instead. It’s the same microcontroller used by the well-known Arduino Nano development board, which means that the supply is enormous and that it comes with a tonne of tooling and documentation and overall familiarity for people into that sort of thing. It ends up being cheaper and simpler to build around this microcontroller, because I no longer need to have a separate microcontroller for each system module (files, header pins, that sort of thing), it’s got plenty of pins and memory to handle everything itself. It’s still 8-bit and low power and all that, and a chunk of the population would still consider it to be too constrained for ‘real work’, so I’ll say it still counts for my goals.
This board will be a nightmare to actually wire up, I’m planning on using some hair-thin thin prototyping wire for the hundreds of tiny connections that need to be hooked up, but it’s borderline impossible to see and trace once you’ve got more than five wires crossing over each other. If I want people to actually have a good time putting this together, I’ll need...
An electronics kit
Okay, so this is the first practical design. The idea is that I design up a proper PCB with holes in all the right places, get a bunch of them printed in bulk, and then I can ship them out alongside a bag of components and a nice instruction book so that people can solder up their own computer and learn how it works along the way. The board handles all of the connections, so you won’t need to finangle the wiring or anything. It’ll be a breeze.
While surface-mount components are a lot cheaper than through-hole components these days, I’ll still design this board to use through-hole components. On one hand, they’re so much easier to solder, which is really important if it’s going to be a DIY kit. And on the other hand, something about the chunkiness of the components makes the board look more real and tangible, like you can almost see the bits and bytes pumping through the pins. You can more easily point to the components and learn what they do. I dunno, I don’t think I can really explain it rationally. It’s just friendlier to look at.
The price is the same as the first design, the circuit layout will be the same.
This design will be good for people who want to mess around with electronics and do soldering and stuff, but it’s no good for, say, primary school kids or other beginner learners who want to press buttons and see something cool happen. I’d also feel a bit nervous seeing it thrown around or dropped, especially with all of the sharp metal pins sticking out. What we need is something a little bit more like...
The humble tamagotchi
This is our second and final design, something that should be able to survive in the bottom of a school backpack (beneath the drink bottle, next to the old sandwich).
Start with the same base design as before, but we can move to surface-mount components now. The microcontroller is NZD$3.40, memory is NZD$3.83, IO expander is NZD$3.38, microSD card slot is still NZD$2.43. We’ll want a second memory chip to support the Bedrock screen, memory, and audio devices, and then add in a small monochrome LCD screen for USD$2.18 alongside a battery holder, voltage converter, tiny speaker, eight small buttons, and a handful of LEDs and resistors. That’s, say, NZD$30 in parts?
The form factor that I envision is something not unlike the Game Boy Micro (or perhaps the aforementioned Tamagotchi if I only use a couple of buttons). A screen in the middle, a D-pad and four face buttons, and board and batteries underneath, in a shape that’s nice to hold for a bit. The thing that’ll make this cooler than the Game Boy though is that it’ll have a line of recessed header pin sockets under the top and bottom edges of the case for input-output pins and the device bus. This means that you can still hook the input-output pins up to electronics projects to mess around with buttons and motors and lights, and you can also connect a keyboard and mouse (and maybe a bigger screen) to the device bus and use the whole thing like a very small computer, opening a text editor or filling out some spreadsheets. Pretty cool stuff.
The screen and buttons and speaker mean that you can run some cool programs using just the built-in hardware too.
Thanks
That’s about where I’m up to now. Thanks for the support for all this, I hope that these experiments are as fun to read about as they are to write about. Catch you next time!